Difference between revisions of "Adding Photos & Images"
| (3 intermediate revisions by the same user not shown) | |||
| Line 1: | Line 1: | ||
You can add images and files to your Photo Gallery. All images need to be associated with a gallery to be connected to the 'Photos' menu button. To begin adding photos to your Chapter site, click on the Photo button on the top navigation bar. | You can add images and files to your Photo Gallery. All images need to be associated with a gallery to be connected to the 'Photos' menu button. To begin adding photos to your Chapter site, click on the Photo button on the top navigation bar. | ||
| + | |||
| + | == Adding A Photo Gallery == | ||
[[File: Chapter Gallery Start.png | Start at Photos on Upper Menu]] | [[File: Chapter Gallery Start.png | Start at Photos on Upper Menu]] | ||
| Line 18: | Line 20: | ||
'''Note''' - You can choose to 'Upload' a new file/image or you can choose from 'My Files' which will show the images or files you have loaded. | '''Note''' - You can choose to 'Upload' a new file/image or you can choose from 'My Files' which will show the images or files you have loaded. | ||
| − | + | ||
| + | == Adding Files == | ||
Adding files to your content pages like a blog post is done with the 'Add Media' button. | Adding files to your content pages like a blog post is done with the 'Add Media' button. | ||
| Line 25: | Line 28: | ||
| − | You can add many types of media and image files. | + | You can add many types of media and image files. See the media type list in the add media files window. |
| − | [[File: Add media Files.png | Choose | + | [[File: Add media Files.png | Choose Your Media's Location Buttons]] |
This is where you can choose the location of your media type. You can upload a new file, embed a video from YouTube or Vimeo, or select a file you previously uploaded under 'My Files' | This is where you can choose the location of your media type. You can upload a new file, embed a video from YouTube or Vimeo, or select a file you previously uploaded under 'My Files' | ||
| − | + | == Reference Information for Images == | |
| − | |||
| − | |||
| − | |||
Include pictures in your next newsletter. The links below will take you to some of our favorite stock photography websites. The rights to use the photos from these sites are available for purchase. Please refer to the site's usage/ licensing policies prior to purchasing, downloading and utilizing the photos in your TU publications. | Include pictures in your next newsletter. The links below will take you to some of our favorite stock photography websites. The rights to use the photos from these sites are available for purchase. Please refer to the site's usage/ licensing policies prior to purchasing, downloading and utilizing the photos in your TU publications. | ||
Latest revision as of 11:53, 18 February 2014
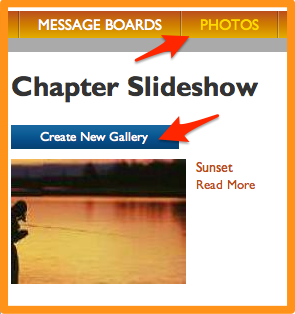
You can add images and files to your Photo Gallery. All images need to be associated with a gallery to be connected to the 'Photos' menu button. To begin adding photos to your Chapter site, click on the Photo button on the top navigation bar.
Adding A Photo Gallery
First go to Photos and then click on Create New Gallery. This is where you title your gallery and add info about the gallery.
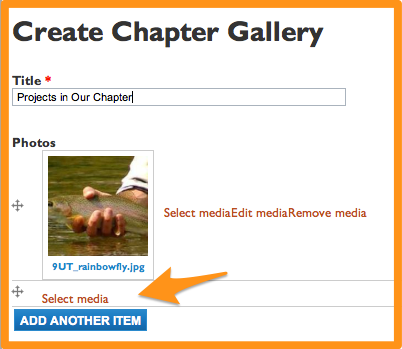
Next, you will add the photos to your gallery by choosing 'Select media'. You can arrange the order of the photos with the + crossed bars.
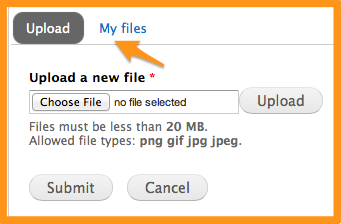
Note - You can choose to 'Upload' a new file/image or you can choose from 'My Files' which will show the images or files you have loaded.
Adding Files
Adding files to your content pages like a blog post is done with the 'Add Media' button.
You can add many types of media and image files. See the media type list in the add media files window.
This is where you can choose the location of your media type. You can upload a new file, embed a video from YouTube or Vimeo, or select a file you previously uploaded under 'My Files'
Reference Information for Images
Include pictures in your next newsletter. The links below will take you to some of our favorite stock photography websites. The rights to use the photos from these sites are available for purchase. Please refer to the site's usage/ licensing policies prior to purchasing, downloading and utilizing the photos in your TU publications.
If you are looking for free images try the following Public Domain photo websites. Please note that each site has required copyright / credit information that must appear with images used. It is your responsibility to follow the rules governing photo usage on images downloaded from the following public domain sites below.
- National Park Service's Historic Photograph Collection
- U.S. Fish &Wildlife Service Pictures
- U.S. Fish&Wildlife Service's Digital Library System
- National Resources Conservation Service Photo Gallery
Taking Great Photos
TU's very own Chris Hunt shared some tips on capturing and sharing your special moment on his Taking Great Photo's blog
Image Size
Best image size on average is about 690 pixels wide. When resizing, select the option to maintain aspect ration. A standard size the you see on the web is 640 x 480 pixels.
Proper Image Citation
Here is a blog post on Properly Citing Images in your content.
Map It & Tag It Feature
Use the Map It & Tag It Feature to help your members see where you took the shot.


