Difference between revisions of "Add Blog Post"
Jump to navigation
Jump to search
| (One intermediate revision by the same user not shown) | |||
| Line 10: | Line 10: | ||
*(1) Title of course. | *(1) Title of course. | ||
| − | *(2) Image that will serve as the tile image in the tu.org site. | + | *(2) Image that will serve as the tile image in the tu.org site. Try not to leave this blank. |
*(3) Excerpt that will be like the short description you see on an internet search. | *(3) Excerpt that will be like the short description you see on an internet search. | ||
*(4) Body content. Be sure to add as plain text and edit in this field. | *(4) Body content. Be sure to add as plain text and edit in this field. | ||
| Line 18: | Line 18: | ||
| − | And finally, you can use the | + | And finally, you can use the [[Map It & Tag It Feature | Map It and Tag It]] feature to show the location. Move the map and click on the location where you what the "map marker" to show up. Be carful, everyone will know your spot. |
You can also tag it buy entering descriptive words that help members find your blog when searching. Think about how your readers will look for your content. | You can also tag it buy entering descriptive words that help members find your blog when searching. Think about how your readers will look for your content. | ||
Latest revision as of 16:40, 19 December 2013
Adding a blog post is an easy way to get information out to your members and share all the great things you are doing in your community.
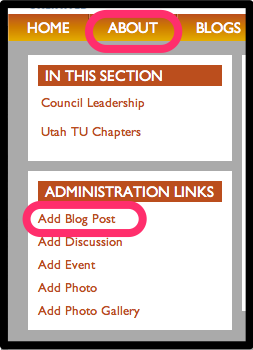
To begin, login to tu.org, go to the About tab and then click on "add blog post".
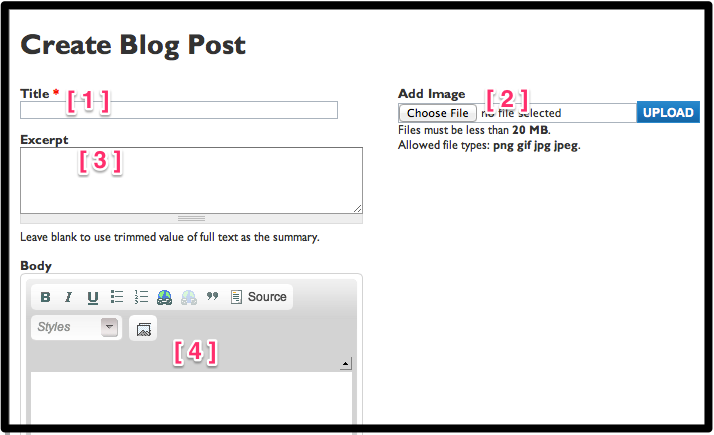
The next step is to fill in the fields of your blog post
- (1) Title of course.
- (2) Image that will serve as the tile image in the tu.org site. Try not to leave this blank.
- (3) Excerpt that will be like the short description you see on an internet search.
- (4) Body content. Be sure to add as plain text and edit in this field.
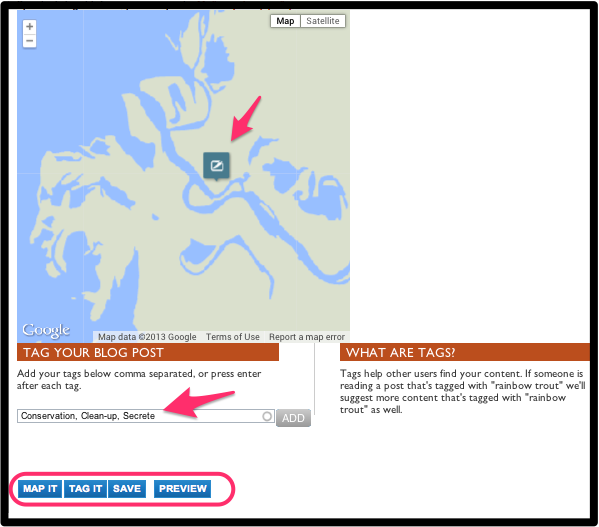
And finally, you can use the Map It and Tag It feature to show the location. Move the map and click on the location where you what the "map marker" to show up. Be carful, everyone will know your spot.
You can also tag it buy entering descriptive words that help members find your blog when searching. Think about how your readers will look for your content.
Be sure to save it. That's it, you have a blog post.


