Adding Content
Be sure to begin with the Getting Started Guide for information to help prepare for adding content. You will be using a simple WISIWIG editor to add content to your site. Here is a short video that helps explain about using a WISIWIG Editor
Contents
- 1 Using plain text
- 2 Editing Existing Pages
- 3 Creating New Content
- 4 Adding Social Media Buttons
- 5 Find Us On Facebook Button
- 6 PayPal Donate Button
- 7 Google for Nonprofits
- 8 Adding Weather Widget
- 9 Adding Google Analytics
- 10 Get started with Analytics
- 11 Adding Google Analytics to Your Chapter Site
Using plain text
When adding content to your Chapter Site, it is best to either write your content in the WYSIWYG editor or to paste in plain text. Plain text is text that is not computationally tagged, specially formatted, or written in code. You can then make your formatting changes within the editor tool.
When you copy and paste content from a word processor like MS Word, you are also copying formatting detail that causes formatting issues in the page. There are a couple of ways to avoid this.
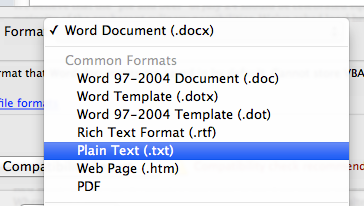
Save As Plain Text (.txt)
You can save your content as plain text and then copy and paste that plain text into the WYSIWYG tool. Here is what you look for when saving your content.
Use a plain text editor
You can use a text editor to either write your content or copy and paste into the text editor. Then, you will copy and paste the plain text into the WYSIWYG tool.
Here are some text editors that you may be familiar with:
Windows
Apple
- TextEdit http://en.wikipedia.org/wiki/TextEdit
- TextWrangler http://en.wikipedia.org/wiki/TextWrangler
There are many editors to choose from. Be sure to look around to find the option that works best for you. You can learn more about text editors on the text editor Wikipedia page.
Editing Existing Pages
Getting Started Admin Pages is where you find information on editing the Site Administration blocks.
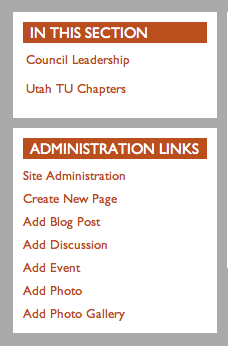
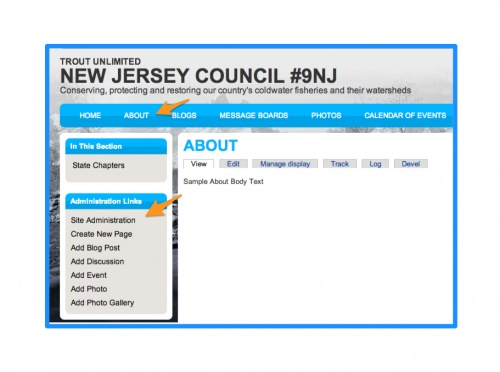
The path to start adding content on your Chapter Site is the About page and then click on Site Administration in the left navigation box. See the example of Site Administration below.
Creating New Content
This is the section that help you walk through adding content to your chapter site. Click on the links below to see how to add each content type.
- Add Events
- Add Blog Post
- Add Discussion to Message Boards
- Adding Photos & Images in Photos page
- Using Action Alerts Take Action!
- Create New Page
- Map It & Tag It Feature
- Adding and linking images in posts
- Embedding video in posts
Adding Social Media Buttons
To broaden your reach, it is helpful to make your visitors and members aware of other sites. Of course it is up to the chapter to decide what features and services would be helpful. Be aware that most services charge a fee.
Find Us On Facebook Button
An easy way for your visitors to find you Facebook page is to add a button to you About page.
To add this, you need to include some html at the bottom of the About page that looks like this:
<p><a href="https://www.facebook.com/YourFBpagename" target="_blank"><img src="http://YourChaptersite.tu.org/sites/default/files/Facebook.jpg"></a></p>
Please note: your Facebook page address will be listed after https://www.facebook.com/ and your chapter website will be listed in the image source. Here is an example for The Stonefly Society:
<p><a href="https://www.facebook.com/stoneflysociety" target="_blank"><img src="http://stoneflysociety.tu.org/sites/default/files/Facebook.jpg"></a></p>
If you are not sure how to add this to your About page, contact Doug Agee about adding a FB button
PayPal Donate Button
Paypal offers several solutions for nonprofits. Here is a page on accepting donations with PayPal
PayPal has several options that may be helpful to your fundraising efforts. Here is the page on Buttons for donation on PayPal's site. You will first build the button using their wizard and then copy/past the button in the body field of your page.
There are chapters using the shopping cart feature on Paypal to sell classes, banquet tickets, event tickets and more. Here is a page on Buttons for shopping cart purchases that may be helpful.
Google for Nonprofits
Google has some tools that can be helpful to nonprofits. Take a look on the Google for Nonprofits page to learn more.
Adding Weather Widget
Adding a weather widget provides information that will be useful to your visitors. Here is an easy way to add it to your site.
Weather Underground
Start by visiting the Weather Underground sticker page at www.wunderground.com/stickers. Take a look at the different options. In some cases, you will need to choose a station that is close.
Pick your style of sticker and then click and choose the html code that is shown.
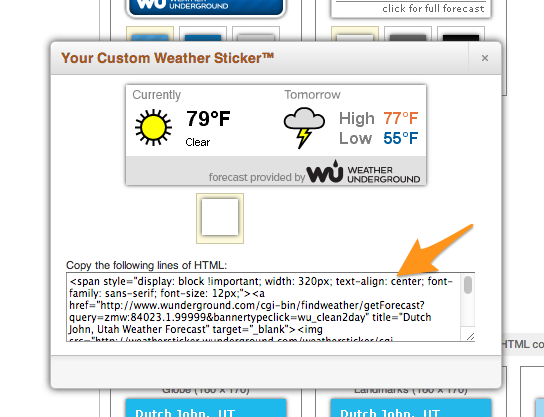
In the body of your page, switch the Text Format to Plain text
The Text Format selection is found below the body.
Then paste the html you copied.

Switch the Text Format back to Full HTML to check the layout. And, don't forget to save your work.
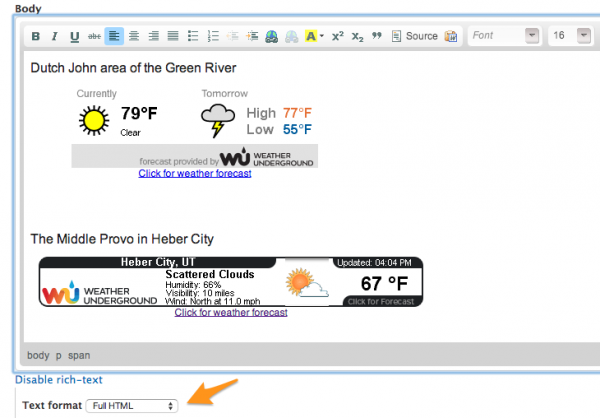
That's it. Here is an example of just the widgets on the Stonefly Society weather stations page.
Adding Google Analytics
Adding Google Analytics is a service offered by Google that generates detailed statistics about a website's traffic and traffic sources. Google Analytics can track visitors from all referrers, including search engines and social networks, direct visits and referring sites. Please see more detail on Wikipedia about Google Analytics
You can also visit the official Google Analytics site at www.google.com/analytics
Get started with Analytics
Three steps to sign up and set up analytics.
Step 1: Sign up for an account.
Visit the Google Analytics website to sign up for a new account. Click the Access Google Analytics button and follow the on-screen instructions.
If you already have a Google account you can go here accounts.google.com/SignUp
If you don't have a Google Account or Gmail and prefer to user your own email address, go here accounts.google.com/SignUpWithoutGmail
Step 2: Set up account properties.
Google Analytics is flexible and can support different account configurations, but your setup affects how data appears in your reports. To help plan your setup, consult the articles in our overview of accounts, users, properties, and views.
If you’re setting up Google Analytics to track an app, consult our best practices for mobile-app analytics setup.
Step 3: Set up your tracking code.
Include the Analytics tracking ID and code in your website or mobile app in order to collect and send usage data to your Analytics account. You can track multiple properties in the same account, but every property must be set up individually. Follow different processes to set up web tracking and to set up mobile app tracking.
After you’ve completed your set up, return to this Help Center to learn more about managing your account, using your reports, and linking Google Analytics to AdWords.
If you link Google Analytics to your AdWords account, Analytics automatically tracks the behavior of users coming from your AdWords ads. This data can help you gauge the ROI of your AdWords budget and make informed decisions about changes to your AdWords account.
This information and more training can be found on the Google Analytics page at Google Training & Certification
Adding Google Analytics to Your Chapter Site
Once you have obtained your Tracking ID number, it is time to install it in your Chapter Site.
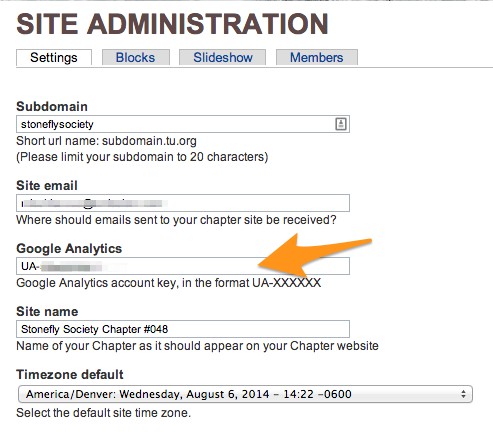
Step 1: Access your Site Administration page
Step 2: Paste your UA number in the Google Analytics field. You will be replacing the TU National UA number.
Step 3: Save Your Work
Be sure to click on the ![]() button before you leave this page.
button before you leave this page.
That is it. Be sure to give your site 24 hrs to start collecting data. You can then check your Google Analytics Dashboard for information on your site.
